{data.map(author =>

 )}
)}
{author.user.name}
{author.company.name}
 Modern applications need rate limiting to protect against abuse, manage resources efficiently, and enable tiered API access. Without rate limiting, your application is vulnerable to brute force attacks, scraping, and potential service disruptions from excessive usage.
JTBDOS has a `rate-limit` package powered by [`@upstash/ratelimit`](https://github.com/upstash/ratelimit-js), a connectionless (HTTP-based) rate limiting library designed specifically for serverless and edge environments.
## Setting up
Rate limiting is enabled for the `web` package contact form automatically by the existence of a `UPSTASH_REDIS_REST_URL` and `UPSTASH_REDIS_REST_TOKEN` environment variable. If enabled, the contact form will limit the number of requests to 1 per day per IP address.
To get your environment variables, you can sign up at [Upstash Console](https://console.upstash.com) and create a Redis KV database. You can then find the REST URL and REST token in the database details page.
You can then paste these environment variables each of the [environment variables](/env) files.
## Adding rate limiting
You can add rate limiting to your API routes by using the `createRateLimiter` function. For example, to limit the number of AI requests to 10 per 10 seconds per IP address, you can do something like this:
```ts apps/app/api/chat/route.ts
import { currentUser } from '@repo/auth/server';
import { createRateLimiter, slidingWindow } from '@repo/rate-limit';
export const GET = async (request: NextRequest) => {
const user = await currentUser();
const rateLimiter = createRateLimiter({
limiter: slidingWindow(10, '10 s'),
});
const { success } = await rateLimiter.limit(`ai_${user?.id}`);
if (!success) {
return new Response(
JSON.stringify({ error: "Too many requests" }),
{ status: 429 }
);
}
};
```
## Configuration
The `rate-limit` package connects to an [Upstash Redis](https://upstash.com/docs/redis/overall/getstarted) database and automatically limits the number of requests to your API routes.
The default rate limiting configuration allows 10 requests per 10 seconds per identifier. `@upstash/ratelimit` also has other rate limiting algorithms such as:
* Fixed Window
* Sliding Window
* Token Bucket
You can learn more about the different rate limiting strategies other features in the [Upstash documentation](https://upstash.com/docs/redis/sdks/ratelimit-ts/algorithms).
```ts packages/rate-limit/index.ts
export const ratelimit = new Ratelimit({
redis,
limiter: Ratelimit.slidingWindow(10, "10 s"),
prefix: "JTBDOS",
})
```
## Usage
You can use rate limiting in any API Route by importing it from the `rate-limit` package. For example:
```typescript apps/api/app/ratelimit/upstash/route.ts {7}
import { ratelimit } from "@repo/rate-limit";
export const GET = async (request: NextRequest) => {
// Use any identifier like username, API key, or IP address
const identifier = "your-identifier";
const { success, limit, remaining } = await ratelimit.limit(identifier);
if (!success) {
return new Response(
JSON.stringify({ error: "Too many requests" }),
{ status: 429 }
);
}
// Continue with your API logic
};
```
## Analytics
Upstash Ratelimit provides built-in analytics capabilities through the dashboard on [Upstash Console](https://console.upstash.com). When enabled, Upstash collects information about:
* Hourly request patterns
* Identifier usage
* Success and failure rates
To enable analytics for your rate limiting, pass the `analytics` configuration to rate limit client:
```typescript packages/security/index.ts
export const ratelimit = new Ratelimit({
redis,
limiter: Ratelimit.slidingWindow(10, "10 s"),
prefix: "JTBDOS",
analytics: true, // Enable Upstash analytics
})
```
### Dashboard
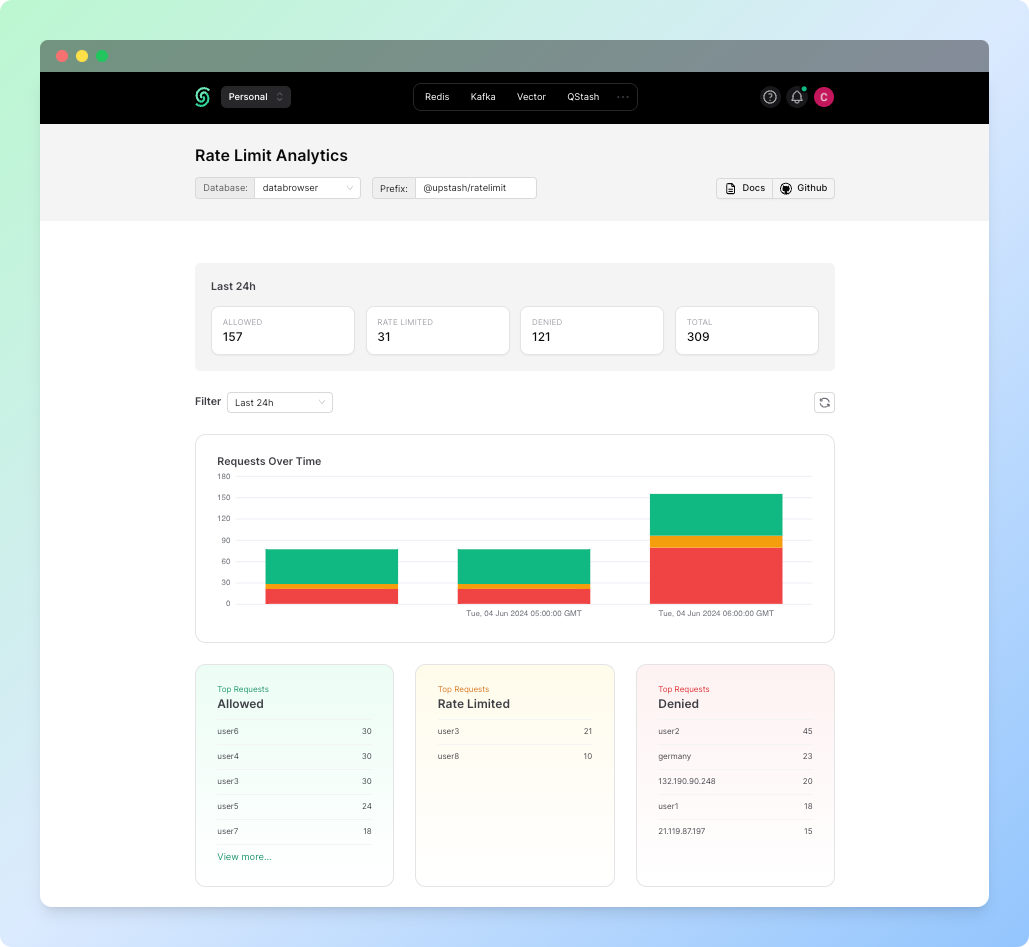
If the analytics is enabled, you can find information about how many requests were made with which identifiers and how many of the requests were blocked from the [Rate Limit dashboard in Upstash Console](https://console.upstash.com/ratelimit).
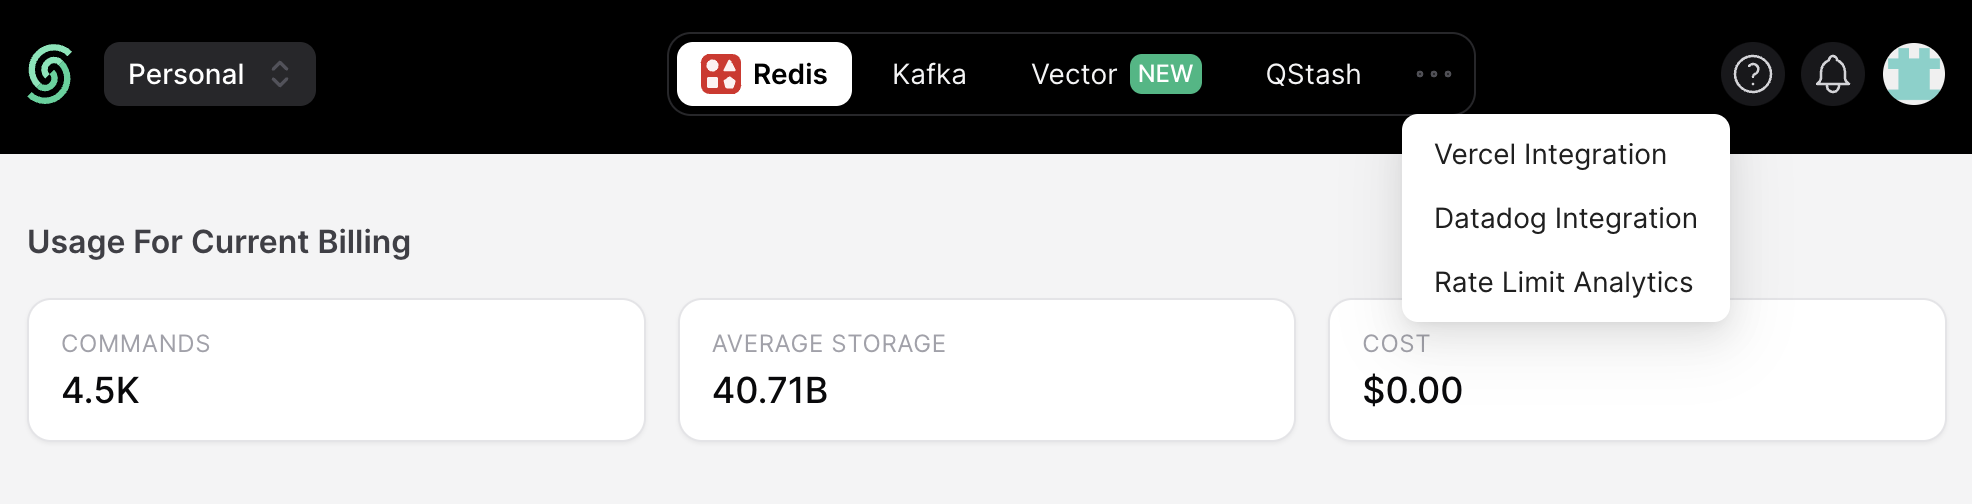
To find to the dashboard, simply click the three dots and choose the **Rate Limit Analytics** tab:
Modern applications need rate limiting to protect against abuse, manage resources efficiently, and enable tiered API access. Without rate limiting, your application is vulnerable to brute force attacks, scraping, and potential service disruptions from excessive usage.
JTBDOS has a `rate-limit` package powered by [`@upstash/ratelimit`](https://github.com/upstash/ratelimit-js), a connectionless (HTTP-based) rate limiting library designed specifically for serverless and edge environments.
## Setting up
Rate limiting is enabled for the `web` package contact form automatically by the existence of a `UPSTASH_REDIS_REST_URL` and `UPSTASH_REDIS_REST_TOKEN` environment variable. If enabled, the contact form will limit the number of requests to 1 per day per IP address.
To get your environment variables, you can sign up at [Upstash Console](https://console.upstash.com) and create a Redis KV database. You can then find the REST URL and REST token in the database details page.
You can then paste these environment variables each of the [environment variables](/env) files.
## Adding rate limiting
You can add rate limiting to your API routes by using the `createRateLimiter` function. For example, to limit the number of AI requests to 10 per 10 seconds per IP address, you can do something like this:
```ts apps/app/api/chat/route.ts
import { currentUser } from '@repo/auth/server';
import { createRateLimiter, slidingWindow } from '@repo/rate-limit';
export const GET = async (request: NextRequest) => {
const user = await currentUser();
const rateLimiter = createRateLimiter({
limiter: slidingWindow(10, '10 s'),
});
const { success } = await rateLimiter.limit(`ai_${user?.id}`);
if (!success) {
return new Response(
JSON.stringify({ error: "Too many requests" }),
{ status: 429 }
);
}
};
```
## Configuration
The `rate-limit` package connects to an [Upstash Redis](https://upstash.com/docs/redis/overall/getstarted) database and automatically limits the number of requests to your API routes.
The default rate limiting configuration allows 10 requests per 10 seconds per identifier. `@upstash/ratelimit` also has other rate limiting algorithms such as:
* Fixed Window
* Sliding Window
* Token Bucket
You can learn more about the different rate limiting strategies other features in the [Upstash documentation](https://upstash.com/docs/redis/sdks/ratelimit-ts/algorithms).
```ts packages/rate-limit/index.ts
export const ratelimit = new Ratelimit({
redis,
limiter: Ratelimit.slidingWindow(10, "10 s"),
prefix: "JTBDOS",
})
```
## Usage
You can use rate limiting in any API Route by importing it from the `rate-limit` package. For example:
```typescript apps/api/app/ratelimit/upstash/route.ts {7}
import { ratelimit } from "@repo/rate-limit";
export const GET = async (request: NextRequest) => {
// Use any identifier like username, API key, or IP address
const identifier = "your-identifier";
const { success, limit, remaining } = await ratelimit.limit(identifier);
if (!success) {
return new Response(
JSON.stringify({ error: "Too many requests" }),
{ status: 429 }
);
}
// Continue with your API logic
};
```
## Analytics
Upstash Ratelimit provides built-in analytics capabilities through the dashboard on [Upstash Console](https://console.upstash.com). When enabled, Upstash collects information about:
* Hourly request patterns
* Identifier usage
* Success and failure rates
To enable analytics for your rate limiting, pass the `analytics` configuration to rate limit client:
```typescript packages/security/index.ts
export const ratelimit = new Ratelimit({
redis,
limiter: Ratelimit.slidingWindow(10, "10 s"),
prefix: "JTBDOS",
analytics: true, // Enable Upstash analytics
})
```
### Dashboard
If the analytics is enabled, you can find information about how many requests were made with which identifiers and how many of the requests were blocked from the [Rate Limit dashboard in Upstash Console](https://console.upstash.com/ratelimit).
To find to the dashboard, simply click the three dots and choose the **Rate Limit Analytics** tab:
 In the dashboard, you can find information on how many requests were accepted, how many were blocked and how many were received in total. Additionally, you can see requests over time; top allowed, rate limited and denied requests.
 ## Best Practices